On September 30, Kiro launched Workflows: one runtime across IDE, CLI, and Web, an opt-in feature with reusable recipes. One sentence covers it:
Run complex work not as one long session but as a pipeline of several agent sessions.
A symbolic release for where coding agents go next: not longer prompts, but pinning SPEC → implementation → independent review → fix → PR as an explicit graph.
The core idea: fresh context per step
Workflows are graphs of steps, sequences, loops, and parallel branches. Five rules explain the whole thing:
Step     one agent runs in its own session
Handoff  a later step receives only earlier results,
         via {{...}} variables
Branch   run independent reviews side by side,
         join them with a policy
Loop     repeat until an approval condition holds
         (with a max-iteration cap)
Wait     watch external state (PRs, deploys) without
         spending model turns
The sentence that matters most:
Each step runs in its own session with fresh context and receives only what earlier steps hand it.
Why build it this way? Piling plans, tool output, and reasoning into one context window makes long sessions lose the plot. Kiro answers that limit with workflow orchestration rather than a bigger window. Reviewers never inherit the implementer's reasoning, so reviews are genuinely independent.
Runs stay steerable throughout. Each step shows its agent, model, effort, and tool activity, with pause, resume, retry, steering, direct messages, and ask-and-wait when a step needs your input. Runs checkpoint at node boundaries, so a disconnect never means replaying from scratch.
Three bundled recipes: investigate, feature-pipeline, publish-pr
The defaults the Kiro team says it uses daily:
investigate
→ read-only single-agent research, running in the background
→ returns a report without polluting the main session's context
→ for "go find out and come back" work

feature-pipeline
→ requirements → design + review → plan → implement →
   parallel independent reviews → final validation
→ design and code loops cap at 3 iterations, abort if unapproved
→ the canonical feature-shipping pipeline

publish-pr
→ opens a PR, retries failed CI, addresses review feedback
→ asks before changing design, expanding scope, or altering UX
→ the finishing pipeline through to merge
Recipes are human- and agent-readable JSON or YAML: describe the outcome, let Kiro generate the workflow, save it, and reuse it. Files in .kiro/workflows/ behave identically across IDE, CLI, and Web.
A real run makes the pipeline tangible. Below is the Workflows run screen from Kiro's official announcement: an auth/session refactor flowing through setup-worktree → investigate → plan → build-loop (cap of 3, on iteration 2) → dual-review in parallel → aggregate → validate, with each step's agent, model, effort, and elapsed time shown as a tree. The completion report with its PASS verdict sits on the left, per-step results on the right.
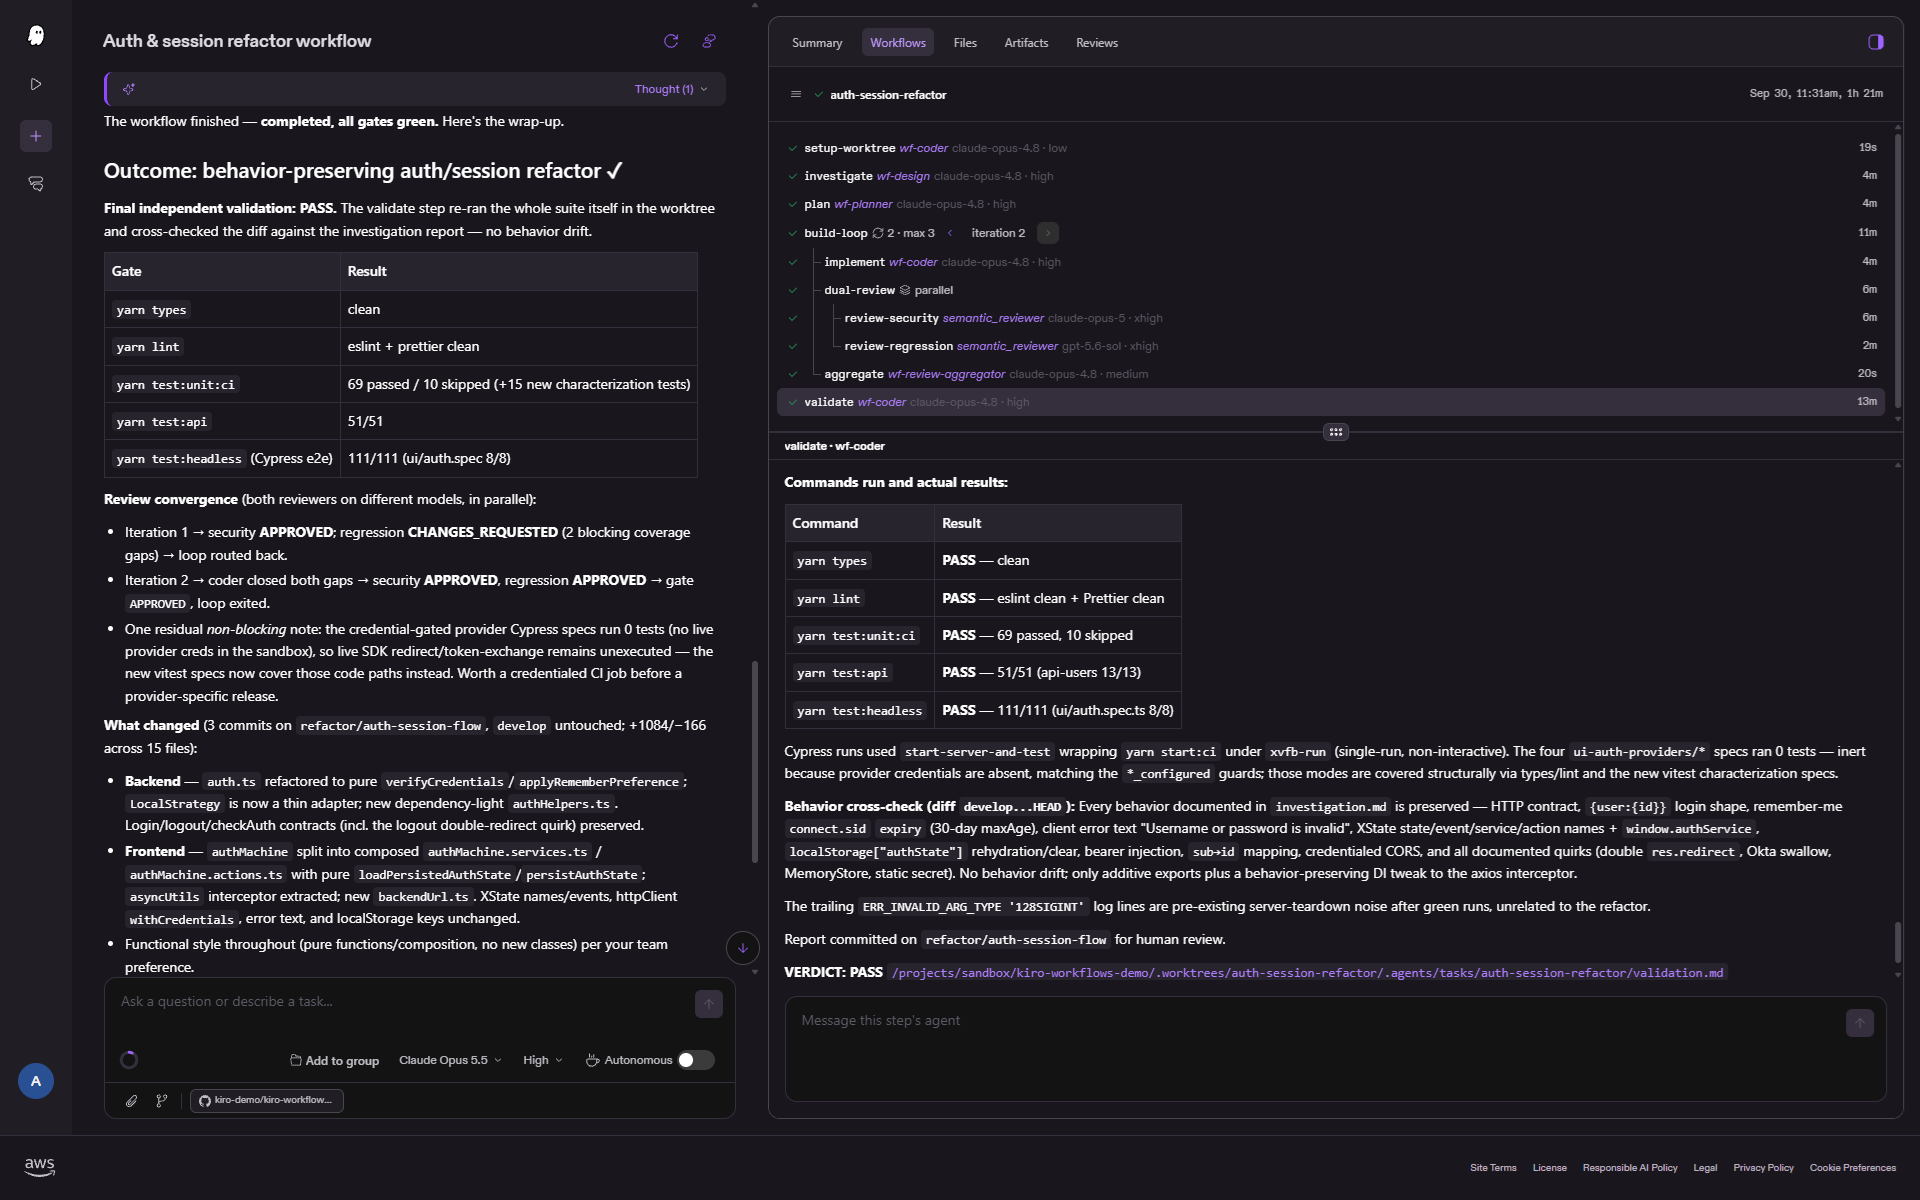
Source: Kiro official announcement "Introducing Kiro workflows" (Sep 30, 2026). Auth/session refactor example run.
Documented limits matter too: at most 8 nesting levels and 50 steps, every repeat needs a positive max, and Git branch isolation or worktree creation is your design job, not automatic. Concurrent runs can overwrite the same checkout, so separate run_dir and artifact paths per run plus worktree separation are recommended.
How is this different from subagents?
An easy confusion, so here is the table:
Subagents (invoke_sub_agent)
→ delegation the main agent orders on the fly
→ structure lives implicitly inside prompts and sessions

Workflows (run_workflow)
→ explicit structure owned by the runtime
→ steps, handoffs, loops, waits, and recovery are first-class
→ backgrounded, inspectable, checkpointed
With Workflows enabled, main-session delegation routes through run_workflow, and launching one custom agent in the background is itself a one-step workflow. Agents inside a step may still use subagents where allowed, but those count as workers inside the step — not nodes of the workflow.
CodeBridge mini lab: 4-step pipeline vs single agent
Turn the briefing's action into an experiment. Run one complex feature both ways and compare failure rates:
Approach A (single agent):
  one-sentence order: "implement this feature with tests"

Approach B (4-step workflow):
  1. implement  build the feature + run related tests
  2. test       verify test evidence (demand proof of passing)
  3. review    independent review (no implementation
              reasoning shared; findings documented)
  4. fix       address findings + re-verify

Fixed conditions: same model, same repo, same time budget
Record:
  [ ] feature completeness (human judgment)
  [ ] defects caught by review (count post-hoc for A)
  [ ] total token/credit usage
  [ ] mid-run interventions (steers, retries)
The usual outcome: approach B spends more tokens but leaks fewer defects and restarts from scratch less often. Teams holding that tradeoff as numbers can justify pipeline investment.
No need to start big. Run one read-only investigation through the investigate recipe in the background. Feeling the main session's context stay clean teaches why step separation exists.
Conclusion: after prompt engineering comes pipeline engineering
The progression, in short:
Stage 1: competing on better prompts
Stage 2: competing on better agents (model + harness)
Stage 3: competing on better pipelines (explicit graphs,
         independent reviews, gates)  ← we are here
This is "what comes after using AI well" from our harness article arriving as a product feature — and loop plus graph concepts becoming savable, reusable recipe files.
One sharp next step: split this week's task into four boxes — implement → test → independent review → fix. Never share the implementation process with the review step. That single line of separation will show you, measurably, how much it cuts your agent failure rate.
Further reading
References
- Kiro: Introducing Kiro workflows (Sep 30, 2026)
- Kiro Docs: Workflows
- Kiro Docs: Workflow examples
- Kiro Web: Introducing Workflows
Go deeper with a course
To practice designing multi-step pipelines, independent reviews, and verification gates by hand, work through harness, loop, and graph construction — exactly like this article's 4-step experiment.